
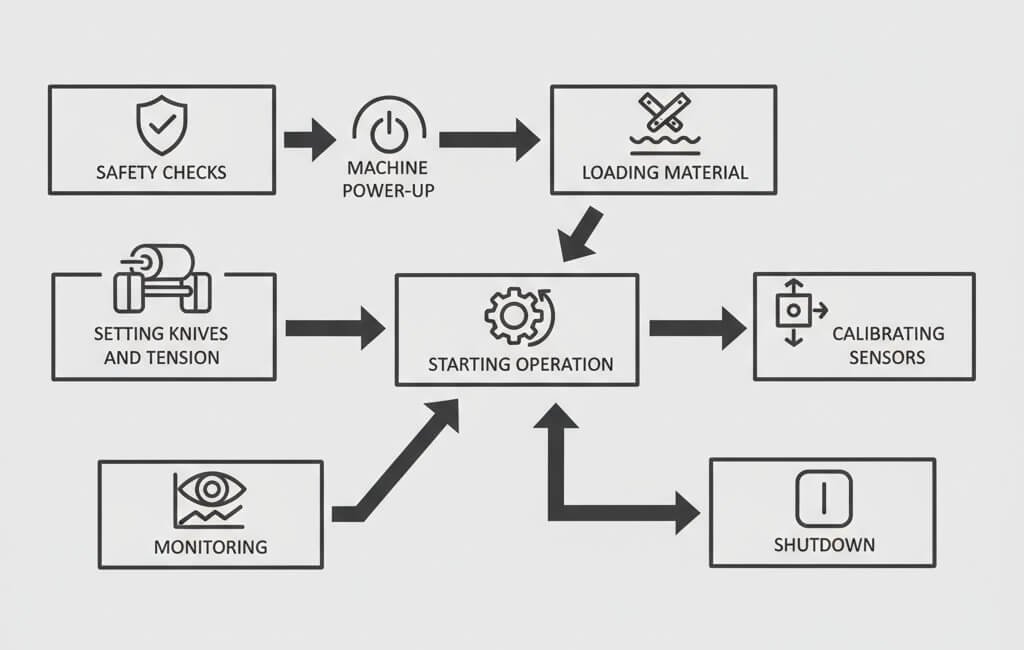
1. Prepare the Work Area and Conduct Safety Checks
Review Safety Documentation and PPE Requirements
Start by thoroughly examining all relevant safety documentation, including operational manuals, hazard assessments, and safety procedures related to the roll to roll slitting machine. Verify the required personal protective equipment (PPE) such as safety glasses, gloves, ear protection, and safety shoes are available and worn to ensure operator safety during machine operations.
Visually Inspect Machine for Hazards and Cleanliness
Conduct a detailed visual inspection of the entire slitting machine and surrounding area. Look for any debris, oil spills, or obstructions that may cause safety hazards. Examine mechanical components for signs of wear, damage, or loose parts. Verify the work area is clean and clear of unnecessary tools or materials to maintain a safe operating environment.
Confirm Emergency Stops, Guards, and Interlocks are Functional
Check that all emergency stop buttons are accessible and operational. Inspect all safety guards and interlocks to ensure they are properly installed and securely fastened. Test the emergency stops and interlock systems to confirm they effectively halt machine operation when activated, ensuring compliance with safety standards before proceeding.
2. Power On and Configure Machine Settings
Power On Main Electrical and Pneumatic Systems
Begin power-up by switching on the main electrical supply following the machine manufacturer’s guidelines. Activate the pneumatic system if applicable, ensuring all valves and compressors are operational. Verify system indicators display proper status indicative of correct power and pneumatic readiness.
Check and Adjust Air Pressure Supply (if applicable)
Examine the air pressure gauge to verify the pneumatic system is within the acceptable pressure range for the intended operation. Adjust regulators as necessary to maintain stable and appropriate air pressure levels, tailored to machine and material requirements.
Verify Machine Initialization and System Reset
Ensure the machine completes its initialization sequence with no errors. Perform a system reset to clear previous faults or alarms. Verify all control panels display ready status and that the system parameters are defaulted or set as needed for the upcoming slitting task.
3. Load and Prepare the Master Roll Material
Select and Mount Material Roll to Unwind Station
Select the correct parent roll according to the production specifications. Using appropriate lifting equipment if needed, mount the roll securely on the unwind station spindle, ensuring it is centered and balanced to prevent wobbling during operation.
Secure Roll Using Correct Core Adapters and Clamps
Install the compatible core adapters to match the roll core diameter. Engage clamps or locking mechanisms firmly to secure the roll in place, preventing slippage or displacement under tension during unwinding.
Verify Material Compatibility and Condition
Examine the mounted roll to confirm it matches required material specifications including width, thickness, and type. Look for visible defects such as tears, contamination, or moisture. Confirm that the material condition is suitable for slitting to prevent processing issues.
4. Set Up Slitting Knives and Tension Parameters
Select Appropriate Knife Type and Install Blades
Identify the correct knife type based on the material characteristics and desired slit width. Install blades securely into the knife holders, ensuring correct orientation and tight fastening to maintain cutting precision.
Adjust Knife Position, Angle, and Gap to Desired Slit Width
Set knife positions laterally along the machine to match the specified slit widths. Adjust the knife angle and blade gap precisely to optimize cutting quality and minimize material damage during slitting.
Set and Test Web Tension Controls Per Material Requirements
Configure the web tension settings considering the material’s tensile strength and sensitivity. Conduct test runs to confirm tension controls maintain consistent web tension without overstressing or slackening, ensuring smooth material feed through the slitting zone.
5. Calibrate Alignment Sensors and Web Tracking
Position Photoelectric/Electronic Edge Guide Sensors
Install and position the edge guide sensors at appropriate locations along the web path to detect material edges accurately. Verify sensors are clean and properly aligned with the web edges for effective guidance.
Calibrate Web Alignment and Activate Auto-Guide Systems
Adjust sensor outputs and set auto-guide systems to maintain web tracking during operation. Enable the auto-guide functionality to automatically correct the web position and prevent edge drifting.
Fine-Tune Sensor Position and Confirm Web Path
Conduct a final check of sensor positioning with the material in motion. Make fine adjustments to sensor angles or locations to achieve stable web guidance. Verify the web path remains consistent and centered through the machine before proceeding.
6. Begin Slitting Operation and Monitor Initial Output
Thread Material Through Knives and Downstream Rollers
Guide the material web through the slitting knives and over the downstream rollers as per machine threading diagram. Verify the web is taut and properly aligned to avoid misfeeds and maintain cutting accuracy.
Initiate Slitting and Monitor Operating Parameters
Begin the slitting operation using the control panel commands. Carefully observe operating parameters such as speed, tension, and blade engagement to verify stable machine functioning and adherence to set points.
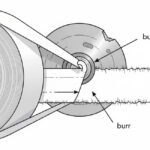
Inspect First Outputs for Cut Edge Quality and Accuracy
Examine initial slit outputs and inspect edges for cleanliness, straightness, and dimensional accuracy. Verify slitting meets quality standards before continuing with full production.
7. Actively Monitor Process and Correct Deviations
Observe Tension, Web Tracking, and Blade Condition Regularly
Continuously watch web tension gauges, sensor signals, and visual web tracking. Inspect blade edges periodically for wear or residue buildup that may affect slitting precision.
Check for Common Defect Symptoms (e.g. Uneven Cuts, Wrinkles, Contamination)
Monitor for signs of defects such as uneven slit widths, wrinkles in the material, or contamination on the web surface. Early detection of these issues helps maintain consistent product quality.
Make On-the-Fly Adjustments to Knives, Tension, or Alignment as Needed
When deviations are detected, quickly adjust knife positioning, blade gap, web tension, or sensor alignment through appropriate machine controls to restore optimal operation without interrupting production flow.
8. Perform End-of-Run Shutdown and Post-Operation Tasks
Stop Slitting Process and Power Down Equipment Sequentially
When the slitting run is complete, gradually reduce machine speed and stop the slitting operation following the proper shutdown procedure. Power down electrical and pneumatic systems sequentially to avoid equipment damage.
Unload and Inspect Finished Slit Rolls for Quality and Label Appropriately
Carefully remove the finished slit rolls from the rewind station. Examine rolls for slit quality, correct dimensions, and absence of defects. Apply appropriate labels indicating roll specifications, batch information, and production date.
Clean Machine, Dispose of Waste, and Log Maintenance Status
Wipe down machine surfaces and remove any debris or waste material generated during slitting. Dispose of scrap responsibly according to facility protocols. Record machine condition, any incidents, and maintenance requirements in the logbook for future reference.